
How to Use an Email with Your Own Domain Through Gmail

Gmail is one of the most widely used email platforms in existence. It was introduced a decade ago to challenge incumbents like AOL, Yahoo, and Hotmail as other web-based mail programs. While it didn’t do a lot special at the time, it had one thing going for it; an absolute ton of storage space. Where most email programs limited your inbox to a few hundred megabytes, Gmail was offering gigabytes. In fact, it used to have a ticker, with the amount of storage space allocated to each account going up by the second.
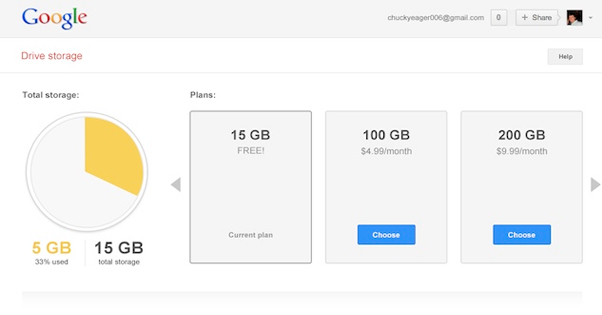
These days, the average user registering a Gmail account has 15 gigs of storage space, completely free. That’s a lot of space! I have a Gmail account from the days of early adoption, and I haven’t even reached two gigs of data in the app.
What does Gmail have going for it these days?
- 900 million users in total, with 90 million of them accessing Gmail through a mobile web app each month.
- An adoption in American business of nearly 25%.
- 99.978% uptime over the last ten years.
As such, it has become something of an accepted professional client for email, much like Outlook used to be. It’s much more professional than a Yahoo or a Hotmail account, though Hotmail was shut down a year or so ago.
Still, some businesses don’t like having a Gmail address for their communications. They want to appear more professional, more upper-class, using their own proprietary email service. Then again, Gmail is a potent platform with a ton of benefits, and chances are these businesses use it anyways.
The solution to this dilemma is to use your own custom domain name, while still using the Gmail back end. If, say, your name is Steve and you’re the VP of Sales at AwesomeBusiness.com, which of these would you prefer?
- AwesomeBusinessSales@gmail.com
- AwesomeBusiness@gmail.com
- SteveSales@gmail.com
- Steve@AwesomeBusiness.com
The answer in many cases, when you care about a professional appearance and you really don’t want to detract from your communications in any way, is the fourth option. It severs your connection with Gmail and makes you look a lot more on the ball, a lot more corporate. Plus, it allows multiple users to have @AwesomeBusiness.com email addresses. You can have Steve, and Nancy, and Dale, and Edwin, all with their own accounts.
You can also depersonalize it, and have Sales, and CustomerService, and Satisfaction, and Inquiries. It’s completely up to you.
Reasons to Use Gmail for Business
At the end of the day, Gmail is just a fantastic web app. It just has a few flaws. I’ll cover both the flaws and the benefits here.
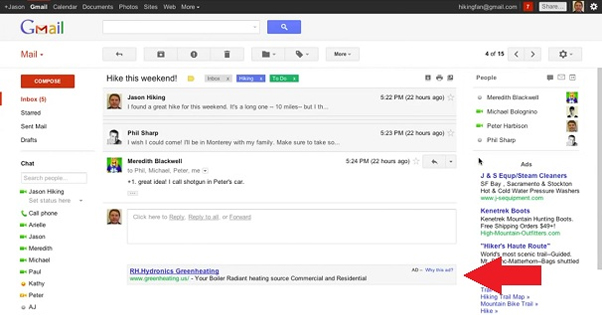
First off, Gmail’s automatic sorting of email conversations into threads is an amazing functionality that should have been available in every single email manager since the dawn of time. No longer do you need long quote strings to remember what you were talking about. You never lose communications in a reply chain. It’s all right there, ready for you to browse as necessary. Plus, when you receive a new reply, the entire chain is pushed to the top of your inbox.
Secondly, it’s insanely safe. Google has an incredible amount of resources and information to combat malware, phishing, viruses, scams and impersonation. Even messages that look legitimate for a dozen different reasons can be flagged because Google knows something you don’t. This has no doubt saved businesses and consumers millions if not billions of dollars in prevented theft and loss.
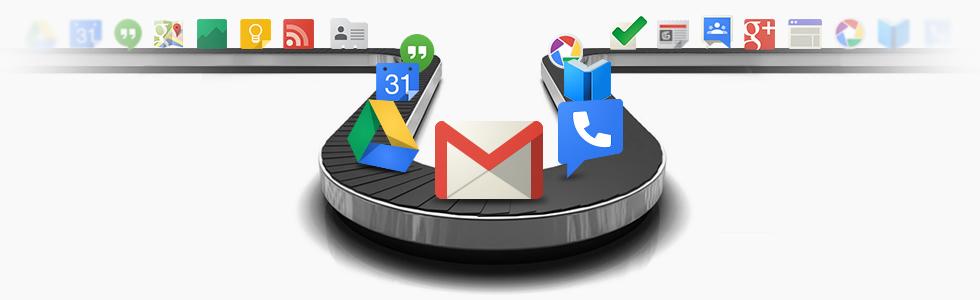
Third, Gmail is a Google – well, now an Alphabet – product, and that means it integrates seamlessly with a wide range of other Google – Alphabet – products. Someone sends you the date for an important meeting? One click and it’s added to your calendar. Want to comment on a YouTube video? Your Gmail account allows you that luxury. Want to store some files? It only takes a few clicks to activate Drive and share them on the cloud.
Gmail is also great for file attachments. They have a file size limit of 25 megabytes, which is plenty for pretty much all situations. In fact, it’s more than most other email services can handle, putting you ahead of the pack. Anything larger can just be sent via Drive.
Guaranteed uptime isn’t a huge concern for most businesses. Most web host email programs and other free email services will have high uptime as well. Still, Gmail had a grand total of two cumulative hours of downtime in the entirety of 2013, which is some really good uptime if it is a concern for you.
Gmail also has a wide range of rich text functionality, along with support for coded HTML newsletters. This is par for the course for many mail programs, but surprisingly, some lack many of the most rich text features.
Speaking of functionality, Gmail is broadly extensible with plugins. You can use a ton of different little apps that add some feature, some functionality, or some capability to Gmail. I previously wrote a post about just that, so here’s a good list.
The Flaws of Gmail
Gmail is not without flaws. If it was, no other email client would exist, because none could compete with the perfect machine.
One major flaw is the advertising. Google is providing the service for free, but it comes at the price of being laced with Google ads. Now, I’m going to be honest here. In the last ten years of using Gmail, I’ve used an adblocker for nine of them, so I don’t know how pervasive or annoying the ads are. The adblocker extensions available for common browsers like Firefox and Chrome will easily block Google ads, and won’t hinder the functionality of the page.
A second flaw is the lack of traditional email folders for sorting. Instead, you just have to archive everything and keep it sorted by labels. In some ways this is more flexible, because you can add multiple labels to one message, and even assign automatic labels for messages from certain sources. Still, it’s not as traditional, and some people will have trouble adjusting.
Speaking of archiving, Google kind of discourages deleting old messages. You certainly can, if you desire, but when you do it’s final. There’s no undelete. By contrast, spam email is easy to delete and is purged from your spam inbox after 30 days.
Overall, I would say the positives outweigh the negatives. The biggest downside of using Gmail is the hit to professionalism, and that’s what I’m about to tell you how to fix.
Using a Custom Domain for Gmail
This process will give you the best of both worlds. You get the functionality, protection, and security of Gmail as your backend email system. You can do away with whatever terrible basic webmail your web host provides. Meanwhile you can use your own domain name for the email provider, so you have @AwesomeBusiness.com rather than @Gmail.com. Great! Where do we start?
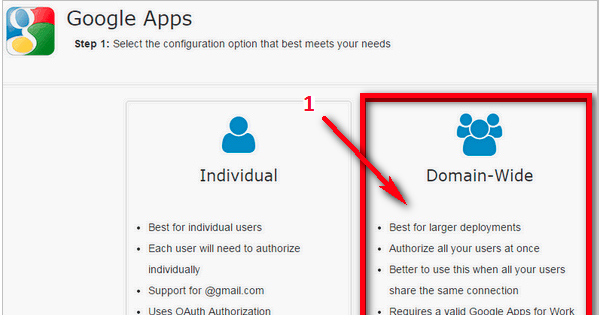
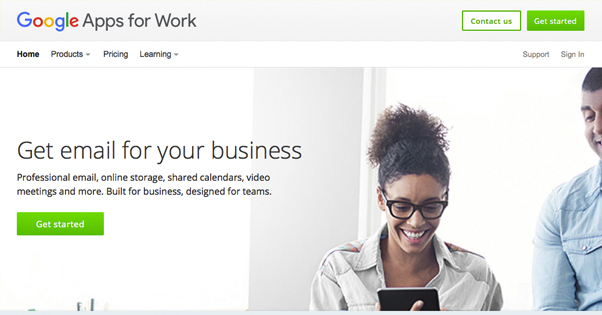
Step 1: Set up a Google Apps for Work account. You can find this here. Just go to the upper right and click the “get started” button to, you know, get started.
Note: I recommend doing this from a desktop, or at least a large tablet. Google is normally very good about making all of their apps and pages responsive, but this page doesn’t adjust to the size of the user’s device, as per traditional responsive design.
In any case, you will be asked to fill in some basic information. Specifically, you need to input your first and last name, your current business email address, your business name, number of employees, country, and phone number. When it says business email address, it’s talking about whatever webmail system you use through your web host. It’s going to help you convert that email address into a Gmail address. If you aren’t using a web host email program, like if you’re using Yahoo or Gmail already, you can input that.
Step 2: Specify your domain information. You have two options here; you can use a domain you already own, or you can buy a new domain. Google prices domains starting at $8 a year, and it’s quick and easy to set one up, but I’m assuming you don’t need to do this because you very likely already have your own website.
Assuming you do have your own website, just click the “use a domain name I have already purchased” and write it in the box below. Click next to proceed with the setup.
Step 3: Create a specific account and finish signing up. You will be asked to choose your username for the email address you’re creating. For example, with the Awesome Business example, your domain from the previous step would have been www.awesomebusiness.com and your username might be Steve, so you would put in Steve in the box.
The rest of the form is easy. Create and enter a password twice, as you do with any signup process. Fill in Google’s Captcha, whether they use a number-based system or their modern “not a robot” checkbox. Determine if you want their email offers, and make sure you click to agree to the terms of service. Click “accept and signup” to finalize the details.
That, my friends, sets you up with an account. Now you need to link your domains. This is a necessary step, because Google needs to make sure you actually own the domain you’re claiming to own here. The last thing they want to do is facilitate spammers or hackers by allowing anyone to claim any domain without verification.
If you’ve hooked Google Analytics in to your website, you’ll be at least a little familiar with the process for linking a domain here. First, start by clicking the banner at the top, where it says “start setup.”
Step 4: Verify your domain. You will be told to click a “verify domain” button, which will initiate the process. This is where things can get a little tricky. Google will look at the domain you specified and will identify who hosts the domain. Sometimes this is accurate, but sometimes it’s incorrect. If you’re familiar with the domain host, either click “go to domain host” or click no, which will bring up a drop-down list of domain hosts, from which you can pick yours.
If by chance you’re not the IT person in control of your site and you’re just trying to set this up on your own, you may need to contact your IT staff for this section. They can tell you who your domain host is and how to access the control panel for the next step.
Once you have chosen the proper domain host, Google will ask you which of three possible methods you want to use to verify. These methods are:
- HTML tag. Google will give you a specific HTML tag for you to put into the head section of your website’s homepage. Google will then look to see if that tag exists. After all, you can’t add a tag to the top of a page that you don’t own.
- HMTL file. Google will generate a file containing a bit of code and ask you to put it on your web server. You will need to put it in the root directory of your site, and then point Google’s verification app at it. Again; you can’t upload a file to hosting you don’t own, so this verifies your ownership.
- Google Analytics. If you have Google Analytics active on your site, you can just link this account with that account. This is perhaps the most simple option, as long as you’re not trying to keep the two accounts separate for some reason.
Pick your chosen method of verification and do it. They’re all pretty easy, so long as you have access to your web server and can upload files or make changes. For example, you can read this post to see the process for HTML file uploading to a site hosted on S-Drive.
Step 5: Add MX records. MX records are the mail exchange entries necessary to link your domain and your email address to Gmail. Essentially, when someone sends an email to your website, your website will send that mail to its own mail server by default. You want to use Gmail, so you need to tell your web server to forward those emails to your linked Gmail account instead.
This process will vary from web host to web host, but in concept it’s pretty simple. You’re looking for a section called DNS Management in your settings. When you find it, you’ll need to create or adjust entries using Google’s MX records, which you can find here.
In some cases, your web host won’t give you the option to change these settings yourself. You’re going to need to message their support and get them to make the change for you. Hopefully, you have a high quality web host, and they won’t take too long to respond.
Regardless of how quickly you put in the DNS settings, they will still take a little time to populate around the web. I recommend checking your old email system for the next day or two, just in case messages get lost going into it instead of into your new Gmail inbox. Ideally, it will only take an hour or so for the DNS to circulate, but it’s better to be safe than sorry.
Importing Old Messages
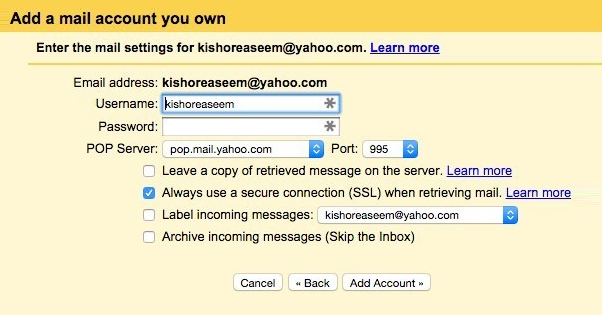
Ideally, to make the transition to Gmail as smooth as possible, you will want to import all of your old messages and contacts. You can do this by logging in to your new Gmail account and clicking the gear. Open settings, click the accounts and import tab, and click to import mail and contacts.
The process for actually hooking up the two accounts and importing the data will vary from provider to provider, but Gmail has a process for everything from AOL to your favorite POP3 account of choice. Gmail will also suggest setting up auto forwarding, but you don’t need to bother, because you already transferred everything in a more direct fashion.
There you have it; a Gmail account in the background, with a customized URL in the foreground, to further your branding and reputation while still using one of the most robust email tools on the web.