
How to Set Up Canned Email Responses in Your Email Client

One of the most time consuming aspects of running a business is managing email. You have hundreds or even thousands of messages a day from suppliers, customers, potential customers, leads, partners, and everyone else besides. Even if a customer is asking a simple question, typing out that answer 50 times a day is bound to fray anyone’s nerves. You can’t just ignore the questions, so what do you do?
Canned Responses
Canned responses are basically just email templates you craft to cut out most of the time involved with responding to emails. Let’s say you very frequently have customers asking you when a product you announced is going to be released. You could just send a quick “11/9/2018” and leave it at that, but that’s not very good customer service.
You could type out a whole message. “Hi #name, thanks for your interest in our product! We announced that the release date is 11/9/2018, but you can preorder now if you want! All you need to do is visit <link> and register for release day delivery. We’re happy you’re interested in our brand, and encourage you to follow our Facebook account for future updates.”
That didn’t take long to write, but it still took a minute, and that adds up when you have dozens of people asking the same thing over and over. So what you do is set up that message as a canned response. You can create a canned message right in most email management apps, and from there it’s only a few clicks to send the message the way you want it to.
What About Bots?
But wait, you say, isn’t this what auto-responder bots are for? There are plenty of sophisticated bots that parse incoming email, identify the question at hand, and shoot off an answer. Why not just use one of those?

Well, there are a few problems with offloading your customer service to a robot like that. On the one hand, it could be overzealous. It might respond with formulaic messages in reply to questions that aren’t actually answered by the message. If you’ve experienced it before, from a customer’s point of view, there are few things more irritating than specifying a question and having some dumb piece of software not answer it.
On the other hand, it might err on the side of caution. It could forward any message it can’t answer to you for a more specific response. This is fine, except when the reason it can’t reply is a typo, a simple question phrased oddly, or another minor quirk in the way people communicate online. A bot that isn’t robust enough will end up saving you very little time at all.
Plus, of course, there’s the expense. Setting up canned responses in your email client is free, whereas autoresponder bots tend to have price tags that put them either out of range of small businesses, or require them to do more to make their value worthwhile.
Plus, with template-based canned emails, you’re able to create and customize a message in just a few seconds. It comes across as much more personal, and you can catch potential mistakes before you send the response. It’s just a better option all around.
Gmail Template Responses
What I’m going to do with the rest of this post is provide you with a way to set up canned emails with three of the major email clients. Gmail is obviously one of the largest, but I’m also going to cover Outlook and Mac Mail. First, though, Gmail.
First, log in to the Gmail client you want to use. This should be your business account, but you can set up canned emails on any account if you want. Heck, maybe you have a persistent mother in law who keeps asking the same old questions; just set up a canned response and save yourself some stress.
Click the gear icon in the upper right corner to expand the options menu. One of the options in the drop-down is settings, so click on that one.
Across the top will be a narrow bar with major settings categories, like General, labels, Inbox, and so on. One of these is Labs; click it.
The Labs function of Gmail is a series of experimental features some people find useful, but that Gmail doesn’t officially support. As such, any of the features within it can be disabled with no warning, and can change in functionality. If that happens to canned responses, let me know, and I’ll update this tutorial.
Anyway, one of the labs is Canned Responses (Templates) by Chad P. Click the Enable button to turn it on, then save your changes. This will refresh your client and bring you back to your inbox.
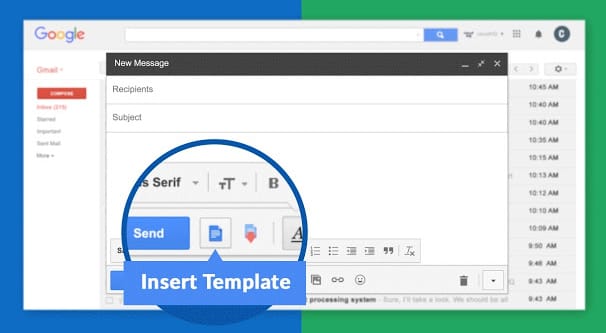
Next, start a new email by hitting the Compose button in the corner. Ignore the recipient field for the moment, and only fill out the subject line if you want to change it when you send a response. In the body of the message, compose the canned template response you want to use.
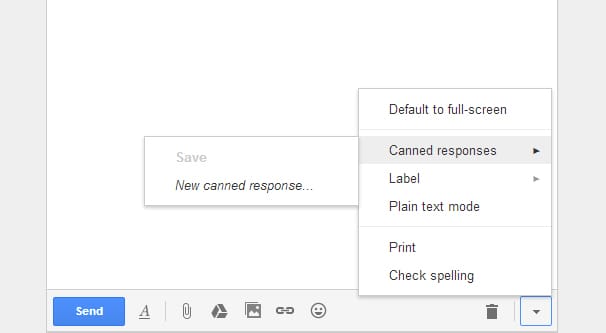
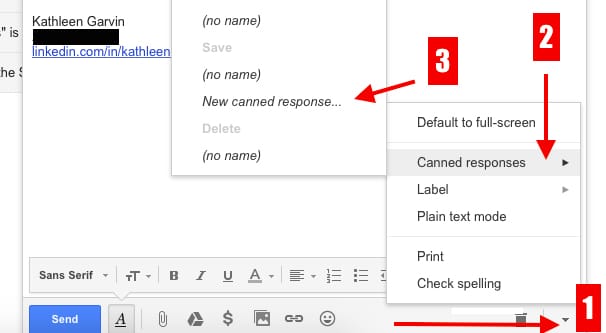
Once you have the message composed, look in the lower right corner of the compose window and find the little triangle button. Click on this to expand some options. One of those should be Canned Responses, with a side arrow. Hover or click on this, and then click “new canned response“. Name your template, and be sure to name it something that describes what it is and how you use it. The last thing you want to do is create more work for yourself in having to dig through the templates to find the right one.
You can now discard the in-progress email draft. You don’t need the draft to exist in order to maintain the template. However, if you were about to send this message to someone with the template information, you can proceed just fine.
Now, to use your canned response, compose a new email the way you normally would. This time, before you type anything in the body, click that lower triangle button and then the canned responses tab again. You will see several options.
- Insert. This has a list of your templates. Click on the one you want to use and the text of the template will be added to your message body immediately.
- Save. This allows you to save an adjustment to an existing template to overwrite it, or save a new template for a different purpose.
- Delete. This allows you to delete a template you no longer use.
I highly recommend leaving space in your template for minor customizations, like the name of the user you are replying to. Make sure to actually customize the message! You don’t want to send a message to “Dear #Username” or something. Unfortunately, any more detailed customizations or dynamic elements to canned emails would require third party software.
Outlook Quick Parts
Outlook as of 2010 has included a feature called Quick Parts. Quick Parts is essentially an engine that allows you to create specific elements of a template, similar to copying and pasting blocks of text, except you don’t need to mess around with the clipboard. Since each part, or Building Block, is saved individually, you can add several of them to a single message.
First, you need to log into your relevant Outlook account, preferably on the device you will be using to manage your email most frequently. I believe Outlook stores quick parts in their cloud, at least with Office 365, though I’m not entirely sure on that.
Compose a new email message with all of the elements you want in your template. If you want, you can just compose a body and leave a salutation or closing call to action as customizations later. Alternatively, you can create several different but similar building blocks for each element, so you can customize messages within templates. One thing to note, you need to use the mark for paragraph breaks if you want them included in one block.
Next, highlight the specific block of text you want to use as your building block. You want the whole thing selected, because that will be your block.
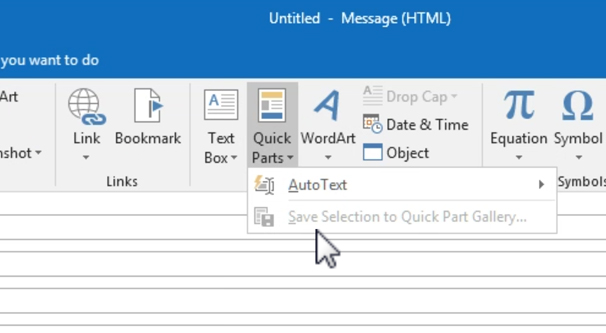
Click the Insert tab, the Text group, and the Quick Parts option. This will present you with a dialogue box asking you to save the selection to the quick part gallery. Click to save it and fill out the information it asks for.
Specifically, Outlook asks for the name of the building block, which should be descriptive enough that you can identify it when you need it. Save it to the appropriate gallery – you can make new galleries for different types of compositions if you want – and choose a category. Type a description of the block and save it.
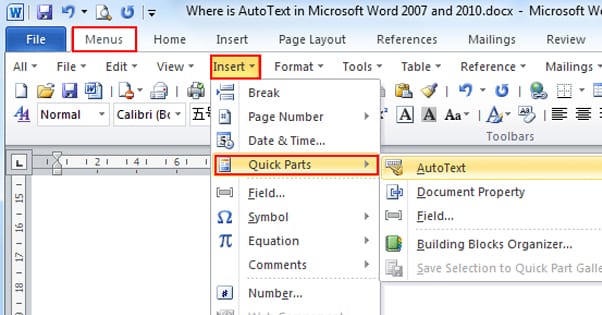
You will have to choose whether the block will insert in its own paragraph, its own page, or just the content where it is. I generally find “own paragraph” to work for my purposes, but you can choose whichever works best for you.
To actually use a building block once it’s saved, compose a new email and put your cursor in the place you want the block to be inserted. Then click the Insert, Text, Quick Parts chain again. Choose the appropriate gallery and block you want to insert, then click Insert.
One interesting feature of Outlook’s building blocks is the ability to save a template that includes them, and then share the template with others.
Create a new blank email and click save as, and then choose to save it as a template file. Open the new template file and add the building blocks you want to have included in the template. Make sure to save the building blocks in the template, not just the gallery you’re using them in. From there, you can simply send the template file to other Outlook users.
Mac Mail
Mac Mail is one of the most common email clients used by Mac users, but unfortunately, it has no native template engine. Some people will tell you there is, but they generally use a workaround that simply saves a draft email that you copy every time you want to send the template. This isn’t very efficient.
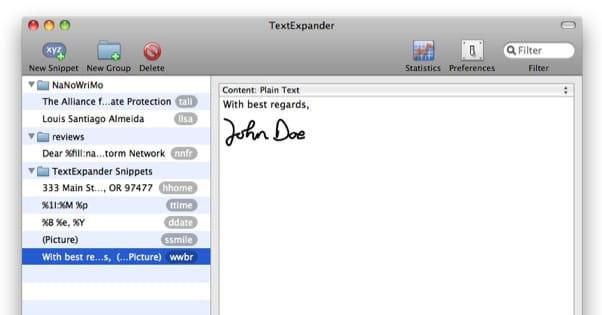
My solution is to use the Mac Text Expander. Text Expander is essentially a macro program that allows you to create small “hot phrases” that, when typed, expand into full blocks of text. For example, you might want to create the same product response template message I have up top.
Something like
- “Hi #name, thanks for your interest in our product! We announced that the release date is 11/9/2018, but you can preorder now if you want! All you need to do is visit <link> and register for release day delivery. We’re happy you’re interested in our brand, and encourage you to follow our Facebook account for future updates.”
With Text Expander, you can create a macro that pastes that full paragraph in when you type a specific keyword. Text Expander keywords typically start with a % symbol, and can be nested within one another. You might make use of the “paste what’s in the clipboard” feature for the name, there. Simply copy the name of the person you’re replying to, and in your template, replace #name with %clipboard.
You can read a very detailed explanation of how to use Text Expander here. Lifehacker even goes through putting together an email response template. It’s a lot more work – and requires a third party app – compared to Gmail and Outlook, but it’s a valid option and can make your life easier, so it’s well worth checking out.