
How to Get Rid of Gmail’s Desktop Email Notifications
Years ago, desktop notifications were a novel experience. It wasn’t all that common for an app to be able to interact with you outside of its own window. Some programs used workarounds to display messages and notifications as pop-ups on their taskbar or system tray icons, but those were always tricky. Sometimes they faded too fast, sometimes they got stuck, they were inconsistent with interactions, and so on.
These days, of course, desktop notifications are extremely common. Every messaging app can show you notifications, and other apps eventually added the additional feature, for one reason or another. Some use it as a marketing technique, some use it as a productivity feature, and some just want to get in on the trend.
Pros and Cons of Gmail Desktop Notifications
With Gmail, the initial push was to include a productivity feature with desktop notifications. When monitoring an email inbox is part of your job, it’s a good idea to be able to have a notification pop up when something lands. That way, you can respond to it immediately.
There are pros and cons to this, to be honest. I’ve written before about the time management necessary to succeed in business, and how email often eats up a lot of that time. Part of it comes down to self-control, and a lot of people don’t have that self-control.
Notifications are great if you want to know each time an email comes in. You can check it, file it away, respond as necessary, and move on with your day.
On the other hand, they’re purely annoying if you’re the kind of person with an out of control email habit. A notification comes in and suddenly 45 minutes have disappeared and no other work has been done. Sure, your inbox might be a bit tidier, but maybe it won’t be. You just keep thinking of new things you need to get done and arranged, or working on conversations rather than work.
If you’re wondering how these notifications turned on in the first place, chances are you hit an “ok” when you shouldn’t have. When you’re logged on to a Gmail account in Chrome, Chrome will push a small pop-up that says “Enable desktop notifications for Gmail” with an OK and a No Thanks as options. If you clicked OK without reading what you were clicking – maybe you thought it was one of those dumb, ubiquitous cookie notifications – you have desktop notifications.
Personally, I kind of hate desktop notifications. They’re always a distraction when I’m working on something else. Some of them are disruptive with sound or with strange interactions with your screen. Some of them just linger a bit too long, or worse, until you manually close them. If you spend a lot of time working away from email, having your focus broken and your attention diverted over and over is never a good thing.
The only time I would recommend email desktop notifications is when you’re waiting for a very important email and would be hammering the refresh button on your browser every few minutes anyways. Don’t do that, by the way; Gmail automatically refreshes when new mail comes in regardless.
That, or if your entire job is based on reading and managing email. I’ve known IT departments or support employees who live their entire lives in the inbox. In that case, though, you may want to consider switching to a ticketing system that is more built to handle these kinds of workflows. Those tend to be a lot more useful.
Desktop Notifications Versus Push Notifications
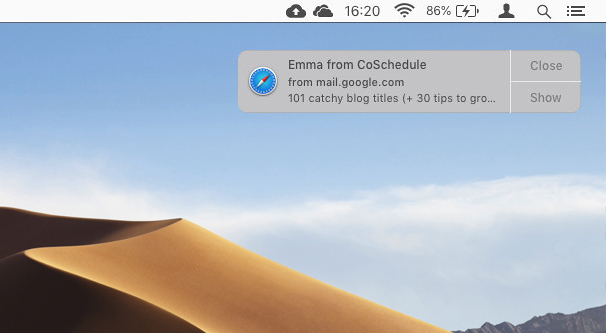
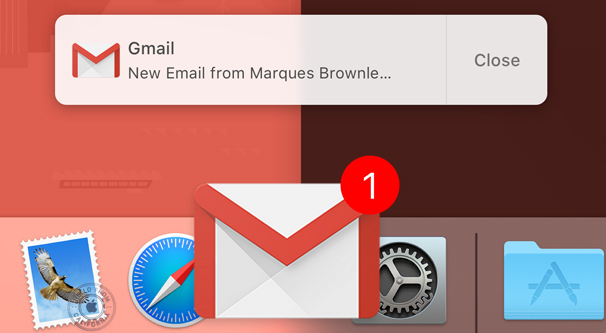
It’s worth noting here that we’re talking about Gmail desktop notifications. Desktop notifications are boxes that show up in the corner of your window when a new email comes in, showing you part of the subject line and initial preview of the email.
Desktop notifications are only applicable to users on a desktop platform, that is, a full-on PC or laptop using MacOS or Windows. Or Linux, I suppose. Is anyone reading this who is techy enough to use Linux but not enough to figure out how to tweak a Gmail setting on their own? I’d be interested to hear that.
Push notifications are different. You may have seen websites frequently asking to be able to send push notifications, which will 100% always be marketing messages, because it’s a marketing tool being used to send them.
Push notifications were originally a tool for mobile marketing. A push notification on a phone is that icon in the top bar that brings a message with it. It might show up on the lock screen, it might take over part of the screen for a few seconds, or some other overlay depending on the phone OS.
Push notifications exist for the desktop platform now as well. They’re basically a browser communications channel, and as such, they are limited to the web browser. This is in contrast to desktop notifications, which can appear even when other windows are in focus or when the browser is closed.
Other than this section, this article talks about desktop notifications. If you’re looking into disabling notifications on your phone, tablet, or browser, you will want to look elsewhere instead.
Disable or Enable Gmail Desktop Notification
Thankfully, it’s pretty easy to toggle the desktop notifications feature on and off for Gmail. Here’s a detailed guide:
Step 1: Log into your Gmail account. Desktop notifications are a per-account setting, so if you’re getting those notifications from multiple accounts, you’ll need to perform this process for each one. Make sure you’re logging into the right account, as well; if only one of them is giving you notifications, you need to be tweaking the settings for that account.
Step 2: Go to the settings menu. The settings menu can be found by clicking the gear in the upper right of your inbox, above your emails but below the bar that shows your username and the grid for other Google apps. Clicking this once will bring down a drop-down menu with a bunch of different options, once of which is Settings. Click the Settings option to be brought to the main Gmail settings page.
Alternatively, you can click this link. It should take you to the right tab of the settings menu directly, for whichever account you have currently logged in.
Step 3: Locate the desktop notifications settings. First, look at the tabs across the top of the settings menu. You want to make sure you’re on the General tab. From there, scroll down. The desktop notifications section is about halfway down the page.
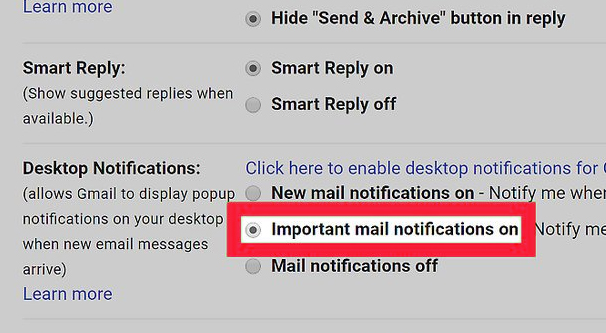
If enabling: Decide which kind of notifications you want. I’m including these instructions as well, since the process for turning these notifications on and off is identical, so I might as well.
If you’re enabling your desktop notifications, you have to choose between Important or New mail notifications. Important notifications will only show you a desktop notification when a message that is marked important arrives. You can tweak Gmail settings in a different location to determine what is and isn’t marked as important.
New mail notifications will arrive when any new important mail arrives and when any new mail arrives in your inbox. This is important because, if you’re using the email inbox categories system. Messages that arrive at a non-primary category inbox will not trigger a notification, unless they are otherwise marked as important.
Step 4: Disable the notifications and save your changes. It’s very easy to just disable notifications, or to restrict them to just important messages, whichever is better for you. If you’re used to notifications but don’t want quite so many, set it to important messages only. If you don’t want them at all, choose mail notifications off.
Once you have chosen the setting you want to apply, make sure you save your settings. You need to scroll all the way to the bottom of the settings page and make sure you click the Save changes button.
Disabling Gmail Desktop Notifications in Chrome
There’s one quirk of Gmail desktop notifications that I haven’t mentioned: they are only available in Google Chrome. Firefox doesn’t allow them, for example, and I believe they are just a feature for Chrome users only. It doesn’t matter what OS you’re using, it’s just within Chrome.
There’s one useful side effect of this limitation, which is the fact that Chrome requires permission to send you notifications. You have to have enabled notifications from Gmail at some point, and that means it was added to a whitelist within Chrome. You can revoke these permissions.
Step 1: Open Chrome. Obviously, if you want to tweak your Chrome settings, you need to have Chrome itself open. You do not need to go to Gmail for this; in fact, it doesn’t matter what page you have set as a homepage, so long as you can access settings for your browser. I know some people operate in a locked-down environment that may limit settings access, which is unfortunate, but there’s nothing I can do about that. If that’s the case, talk to your IT team for more help.
Step 2: Find the settings menu. In Chrome, you need to look at the top bar all the way to the right. There’s three vertical dots; click those. This will open a drop-down menu with a bunch of settings to pick through. You want to find the one that says Settings. This will open a tab with Chrome’s settings and personalization options for you to play with.
Step 3: Find the notification settings section. To do this, you need to scroll all the way down to the bottom and click the Advanced tab. This will expand a bunch more settings than what is normally available in Chrome.
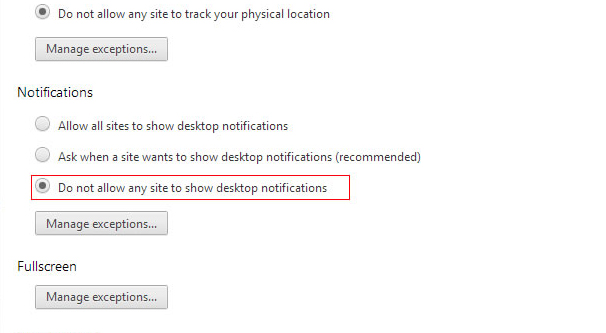
What you’re looking for here is the second to last option in the first Advanced box, which says Content Settings. Clicking this will bring you to another set of options, and there are a lot of them here. Don’t worry, we’re almost done, even if it looks intimidating.
What you want to find here is the Notifications section. It has a bell icon next to it and is about the 5th one down, unless Google has rearranged their settings menu since the last time I looked all of this up. If it has, feel free to let me know.
Step 4: Change your notification settings. There are two sections here: Block and Allow. Under Allow, you should see an entry that looks like “https://mail.google.com:443”. This is the Gmail URL allowing notifications. You can click the three dots to the right of this entry and will be given three options: block, edit, or remove.
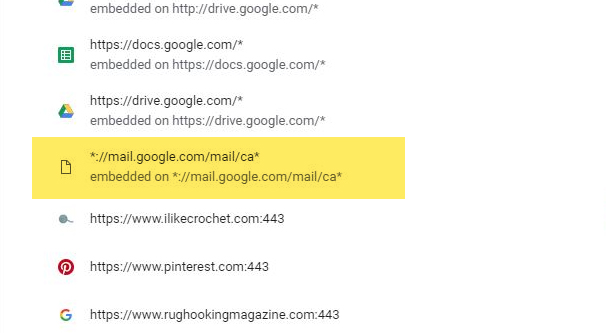
If you want to disable notifications but leave the possibility of enabling them again in the future, simply click remove. This revokes permission but allows you to add it again should you desire, without needing to come into notification settings to do it.
If, on the other hand, you want to prevent notifications from ever coming back, click the block option. This will prevent Gmail from being able to request permission for notifications in the future, and will prevent it from sending new ones now, despite your settings in Gmail itself.
Alternatively, under the Block option you will see an Add button. If you click this, you can simply type in https://mail.google.com to block the setting without needing to find the existing option, if you have a lot of existing allowed notifications.
Note that there is no need to save your settings here; they are saved automatically upon changing the setting.
So there you have it: two ways to disable Gmail’s desktop notifications. You can also, if you want, change away from Chrome. The browser is increasingly memory-hungry and doesn’t offer much in the way of features other browsers lack, so it can be a good idea to transition. Firefox, for example, doesn’t allow Gmail’s notifications, so you can switch browsers to get rid of them permanently. That’s entirely up to you.