
Guide: How to Use Quick Parts in Microsoft Outlook
If you’re one of the millions of people who use Outlook on a daily basis, you’re probably looking for any way you can to save time with your email. It’s so easy to get lost in your inbox and look up to find you’ve wasted three hours and haven’t gotten any of your real work done.
There are a lot of different approaches to saving time with email. You can set up filters and sorting to categorize and process emails before you need to give them your attention. You can apply communication habits that minimize the amount of time you spend writing replies. You can even use tools to voice your emails, under the assumption that you talk faster than you type.
I’m here today to talk about another option available to you, assuming you’re using Outlook. Unfortunately, it’s not an option available out of the box for email programs like Thunderbird or platforms like Gmail, though you may be able to get plugins or extensions that mimic the functionality. This is one area where Outlook’s default configuration shines.
What I’m talking about are Quick Parts, a feature Microsoft introduced in Outlook 2007 as an expansion of a previous feature, AutoText. They’re very cool and can help a lot when composing emails, particularly when you’re composing basically the same thing day in and day out.
What Are Quick Parts?
Quick Parts are basically stored chunks of content. They’re something like a middle ground between a canned email and a text expander shortcut. They can be as long or as short as you want, and they can include text, images, tables, and even formatting.
There are a lot of different uses for Quick Parts, and the only limit is your creativity. Some common uses are:
- Storing your business Name, Address, and Phone Number (NAP information) so you can simply paste in a snippet instead of typing it over and over.
- Storing common introduction or header information, including a business logo, a salutation, and an introduction sentence or two, so you don’t have to fetch images and type the same lines every time.
- Inserting a tablet with pre-configured information for, say, requesting or delivering support information. A nicely formatted table is time-consuming to create but makes an email look more professional.
Of course, you can use them however you wish. Any time you want a certain snippet of text, formatting, images, and other graphics to be readily available, Quick Parts is the way to do it.
Quick Parts is available in all versions of Outlook created after 2007, including 2007 itself. So Outlook 2007, Outlook 2010, Outlook 2013, Outlook 2016, Outlook 2019, and Office 365 can all use them.
How Are Quick Parts Different from Other Options?
If you’re reading this and you’re thinking “I can do that with X other app”, well, you’re maybe right. Apps like AutoHotKey, TextExpander, Alfred, and others can all do similar things. So what makes Quick Parts different?
For one thing, Quick Parts can handle formatting and tables within Outlook itself. Many of these other apps don’t handle things like tables, since those require pasting in back-end formatting or code that you can’t necessarily just slap in, or can’t save in the database format the app uses. The same goes for images; Quick Parts can save images for use in a part, where many of these other expander options do not.
For another thing, Quick Parts is a built-in part of Outlook. You don’t need to have a third party program running to use them, which can run into issues with syncing across different devices. If your AutoHotKey app crashes, you have to fight with getting it back before you can proceed with your email, for example.
Another benefit is that Quick Parts doesn’t require much configuration. I’ll go into how to set it up in a moment, but it’s actually very easy. Some of these other apps require a lot of additional configuration before you can get rolling with them.
And, of course, Quick Parts is free. Since it’s part of Outlook, as long as you have Outlook in the first place, you have access to Quick Parts. You don’t need to buy or maintain an installation of another app, it’s just right there for you.
Creating a New Quick Part
Creating a new Quick Part is incredibly easy.
First, open up a new email, or an email you’re working on, it doesn’t really matter so long as it’s the compose dialogue box.
Next, write what you want to have saved as a quick part. For example, you might write down your name, address, and phone number. You might create a location blog with an image of a map, or the embed code for a map location. You might write down the salutation and introduction to an email, or the sign-off and signature portion if you’re not using built-in signatures in Outlook.
A Quick Part can be as long as you want it to be, as far as I know. I’ve never encountered a character limit in using them, though I also haven’t tried to push the envelope. I figure you’re not likely to write anything long enough to trigger it one way or the other. The only caveat is that if your intended Quick Part has a lot of media, particularly large images, using it might be a bit slow. It’s not always slow, but it could be, so fair warning.
Once you have your Quick Part typed up, including any tables, images, graphics, media, and formatting, highlight it. Make sure your images are selected as well as the text.
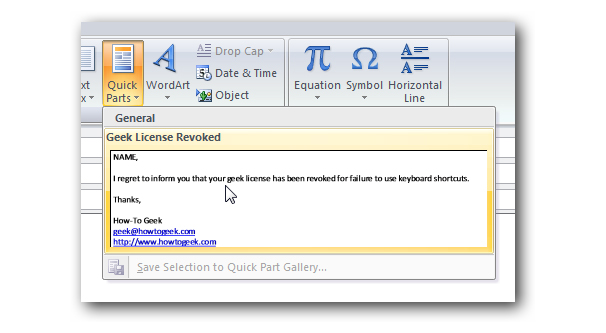
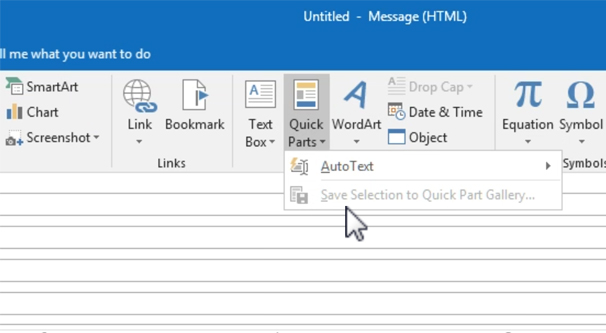
Finally, with the selection chosen, click on Insert, and then Quick Parts. One of the drop-down option is Save Selection to Quick Part Gallery. Click this.
Here you will need to configure your Quick Part. Give it a name, choose a gallery to save it in, choose a category, choose a save location, choose options, and write a description. Some of these are optional, but you at least one a good name. Here are the attributes you can configure:
- Name. This is the name of the Quick Part that will show up in the gallery to select later, and will be a keyword that will trigger a suggestion as you type.
- Gallery. You can choose a custom gallery, but it’s not generally useful to do so. Just save it in the Quick Parts gallery for ease of use.
- Category. These are like sub-folders for Quick Parts. If you have a lot of them for similar purposes, it can make sense to group them. For example, if you make three different levels of contact information (NAP, NAP + map, NAP + social links) you can save them all in one NAP category.
- Description. This is an optional description you can use to remind yourself what a Quick Part is.
- Save In. This is the template location for saving your Quick Parts. Just leave it as is unless you have a good reason to change it.
- Insert Options. You can choose to insert the content as is, insert it as its own paragraph regardless of where your cursor is placed, or insert it into its own page. The last one isn’t useful for email.
Once you have this information configured, simply save the Quick Part by clicking OK.
Using a Quick Part
There are a few different ways you can use a Quick Part while you’re composing email.
The F3 Method. This method is fast replacement method. If you’re familiar with your Quick Parts, this is the fastest method to use them.
To use this method, simply write your email as normal. When you come to a point where you want to insert a Quick Part, type in the NAME of the Quick Part as you saved it. Then hit the F3 key, and the name will be replaced with the full contents of the Quick Part.

For example, let’s say you have a NAP Quick Part named NAP. The Quick Part is your business name, address, and phone number, formatted nicely and with a logo next to them.
Simply type “NAP” into your email and hit F3. The moment you hit the button, you will get the full content of the Quick Part in place of the word NAP.
This is why it’s important to use descriptive, unique, and useful names for your Quick Parts; if you use a common word, you might accidentally replace parts of your email you didn’t want to replace. God forbid you name a Quick Part a single letter.
The Auto-complete Method. This method works for the most recent versions of Outlook, because it’s an auto-suggestion. Basically, Outlook will monitor what you’re typing. If you start typing a phrase that matches the name of a Quick Part, a suggestion will pop up. This suggestion will show you the first few words of the Quick Part, so you know which one it’s choosing.
If you want to insert that Quick Part, all you need to do is hit Enter while the suggestion is visible. If you type more, or type something that breaks from the name of the Quick Part, the suggestion will disappear and the Enter key will simply revert to a carriage return.
There are three drawbacks to this method. The first is that you have to remember to catch the suggestion and use it, which can be annoying if you’re using to typing quickly. The second is that it only works for Outlook 2016 and 2019, not Office 365 or older versions. The third is that this method only works for Quick Parts that are only text; it does not work for Quick Parts that include images.
The Selection Method. This third method is the manual selection method. If you don’t remember the name of your Quick Part, or if you have a lot of similarly-named Quick Parts, or if you don’t use Quick Parts often enough to learn the automatic methods, this method is the best.
To use this method, simply position your cursor a the point in your email where you want the Quick Part inserted. Keep in mind that you can’t insert a Quick Part in the middle of a sentence if you didn’t configure it to insert where the cursor is.
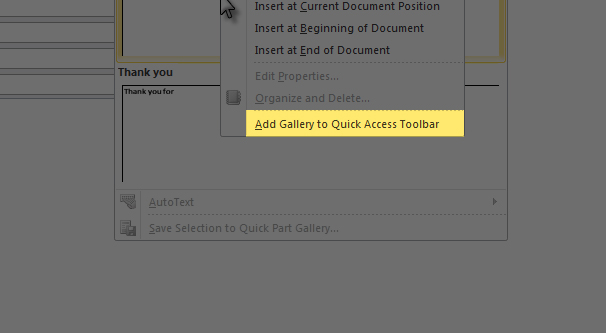
Once your cursor is positioned, click on Insert, then on Quick Parts. This will bring up a few of your common Quick Parts as a preview of your gallery. If you want to insert one of them, simply click it to insert it. You can also right-click to choose to insert it at the beginning or end of the document as well.
If you don’t see the Quick Part you want to insert, right-click on one of the visible entries and click Organize and Delete. This will open the full Building Block Organizer menu. Choose the Quick Part you want to insert and click Insert.
As an additional note, the Organize and Delete menu is also where you can edit existing Quick Parts, including changing any of the attributes listed above, add new Quick Parts, delete old Quick Parts, or otherwise alter them.
I love this feature, and I think you will too, once you have configured some of your most common snippets. It really is a great time saver.