
How to Group Your Email Conversations by Sender

Email organization is one of the more fundamental goals with any structured time management plan, especially one that’s striving to reach the lofty goal of Inbox Zero. I make no promises that grouping your conversations will help you reach it, but it certainly can’t hurt.
Grouping your conversations based on the sender is a good way to condense a lot of conversations into one larger chain, to save space and to recognize who you’re corresponding with the most. How you use it is up to you, of course; I’m just here to help you do it in the first place.
How to Group Your Email Conversations by Sender in Gmail
Gmail does some conversation threading on its own, but it’s based on subject line in and reply chains, not on sender. The same sender can send you a different email and it will appear in a new thread. A new sender sending you something with a duplicate subject line will be its own thread, as well. Sometimes, though, you want to see everything from a single sender. Maybe it’s an automated system and you want to see all of your tickets in one place. Maybe it’s messages from a coworker and you want their information on hand for easy reference. Maybe it’s from your boss and you just want a quick and easy to do list. Regardless, it’s not too difficult to do.
If you’re familiar with Gmail, you can skip the step by step and do it yourself. What you need to do is create a filter for the sender, apply a label to the emails in the search, and apply it to all matching conversations. Here’s how, if you don’t know how to do it yourself.
First, log into your Gmail account.
Next, find an email from the sender you want to group up. Alternatively, type “from:(email@address.com)” into your search bar, with the email address being the one from the sender you want to use.
If you’re in the email, click the three stacked dots up at the top next to the row of icons and click the “filter messages like these” option. If you typed the query into the search bar, click the triangle drop-down for advanced options.
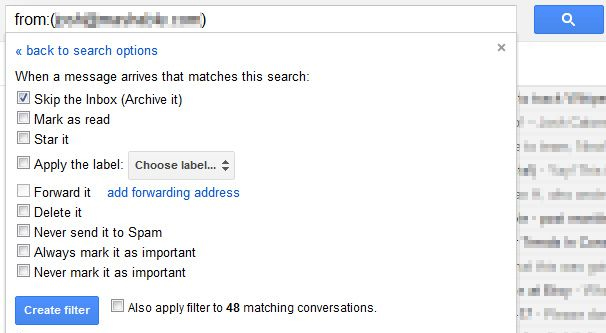
In either case, you should be presented with a box that has information for an advanced search in it. Make sure the sender you want to filter is in the From field. You can also use a bunch of advanced filter options here if you would prefer to only pull out the ones with specific subject lines, specific size attachments, or other qualifications if you so desire.
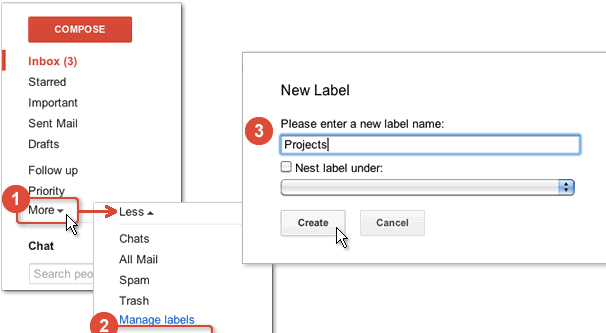
Down at the bottom of this box, click “Create Filter.” This will bring you to the next box, where Gmail asks you what you want your action to be with your filtered messages. Here, choose “apply the label” and select a new label. Create a label that is descriptive of the sender or other purpose of the grouping, such as “boss emails” or “Kickstarter Updates” or whatever you prefer. Create the new label.
Before you create the filter, make sure you also check the “also apply filter to matching conversations” box at the bottom. This will retroactively apply your filter and label to all old messages that match your filter. If you don’t check this box, your label will only apply to emails from this point forward.
Once that option is checked, click create filter. This will create your filter and apply the label to it. You will now have the label in the left hand panel, along side your inbox and other categories. When you click the label, you will see all of the emails that label applies to.
You will need to go through this process for each individual sender you want to have a label or group for. This is slightly tedious if you want to organize dozens of senders, but you can always just create the new filter when a new message from an unlabeled sender arrives, doing it as you go. That way it’s never more than a few additional seconds of time spent with each email, rather than hours spent trying to configure everything here and now.
How to Group Your Email Conversations by Sender in Outlook
Outlook has its own grouping rules for conversations, similar to how Gmail handles them. Outlooks criteria is by date as a default, but you can use different arrangements and create custom groupings fairly easily.
The default arrangements you can choose are based on time, and are Today, Yesterday, Last Week, Last Month, and Older. You can also choose Categories, Size, Subject, and Importance, but none of those are based on sender. Finally, there’s a Conversations option, which threads conversations similar to how Gmail handles them.
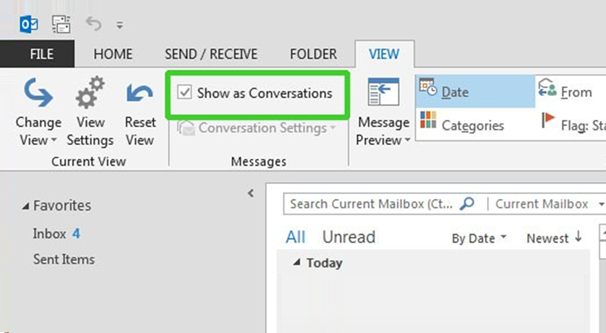
To group items manually, you first need to turn on groups. Look for the View menu, then the Arrangement section. Click the More drop-down to expand this, and find the Show in Groups checkbox. Check this to sort your inbox into groups.
Now you will need to create a custom group for your sender sorting. Again in the View menu, in the Current View group, click Save Current View as New View. You will want to type in a name for your view, and click OK.
Next, go to the View menu and the Current View group, then click on the View Settings menu. Click on “group by” to change your grouping. Clear the checkbox that says to automatically group by arrangement to undo the basic arrangement sort.
Click the Group Items By box, and then click a field that you want to group your conversations by. In this case, you want to choose sender. Determine if you want them sorted in ascending or descending order.
You can adjust other options here, such as subgroups or advanced sorting options. If all you want is sender groups, you don’t need to mess with any of these.
Finally, save your settings. This applies the sort to your inbox and mail in general, and should sort all of your messages into groups based by sender. You don’t have to do this for every sender like you do with Gmail; it just sorts everything in this one view menu. You can also use the same View menu to choose a different sort, and toggle back and forth, now that you have this new view saved.
If you’re still using an older version of Outlook, 2007 or earlier, you can view this page for updated instructions.
How to Group Your Email Conversations by Sender in Mac Mail
Mac Mail is in many ways a high quality email client, but it is quite lacking in a few areas, one of which is convenience features. Apple has long taken a “my way or the highway” attitude towards various hardware and software issues, and it is only their willingness to allow third party apps that keeps things like Mail properly afloat.
Case in point: sorting your email by sender. There are a few ways to do it, but they’re all a little less than convenient.
The first option is to create individual mailboxes, and then create rules that file messages into mailboxes. It’s similar to Gmail’s labels system, but a little less flexible.
First, you need to click on the Mailbox option on your navigation bar, then New Mailbox. Name the mailbox after the sender you want to file away into it.
Next, you want to add a new rule. Click on Mail, then Preferences, then Rules. You can see existing rules, but you want to create a new rule. Click Add Rule, and name your new rule. You probably just want to name it after the sender, again.
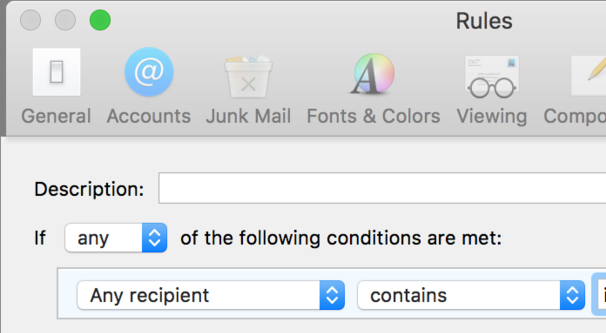
Here you will need to specify your conditions. In this case, your condition is pretty simple, just the sender. If your email matches the sender, it should be forwarded to the mailbox. There’s an easy list of filters you can use here, so it should be trivial to set this up.
Next, hit OK to apply the rule, and apply it to all past emails as well. This will sort your inbox away into the appropriate folders. Now, much like Gmail, you need to go through and do this for every sender you want to filter and group.
The second option you have is to use a third party app to organize your email for you. There are a lot of different email apps available, so I picked out two that should work for you.
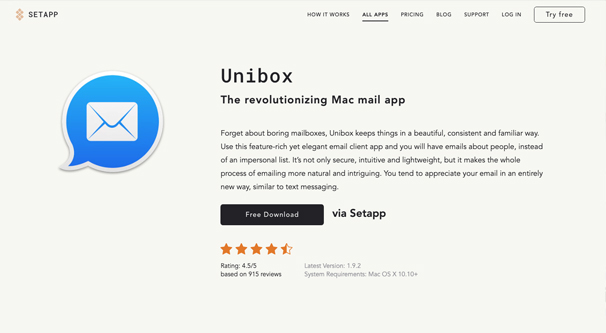
Unibox. Unibox is one of many apps that comes as part of the Setapp suite. It’s a client app for your mail, and its sole purpose is to sort your mail by sender rather than deal with any of the other shenanigans you have to go through for email management. It’s more reminiscent of a customer relations portal than an email client in design, and that’s okay. It does what you want it to in an elegant way. The drawback, of course, is that it’s a paid app. Unibox is free with a Setapp account, and a Setapp account costs $10 per month. Of course, you have access to dozens of apps, not just Unibox, so maybe it’s worth the money for everything else you get as well. That’s entirely up to you.
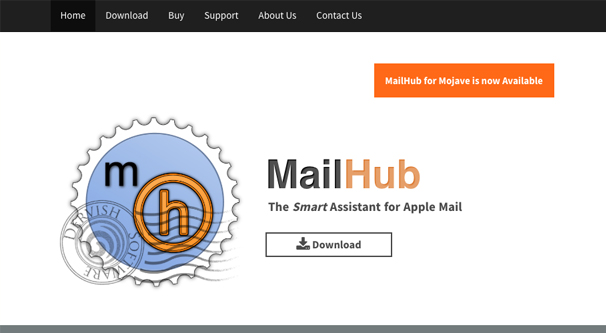
Mailhub. Mailhub is a smart assistant for Mac Mail. It’s a plugin rather than a replacement client, and it links right into your existing mailbox. It’s an app that is free to download and use as an unrestricted trial, and can be purchased for a simple one-time license that costs $19. It can group emails by sender, but it also has a lot of other sorting options, including a smart sort that can be very useful once you have it configured properly.
Again, as I mentioned, there are plenty of other apps and plugins that can work with Mac Mail to sort your inbox. If neither of these work for you, feel free to look around for an alternative that suits your needs.
How to Group Your Email Conversations by Sender in Thunderbird
Mozilla’s Thunderbird might not be one of the top of the line email clients, but it has a dedicated fan base and is still one of the more popular options out there, at least in part because it’s free and open source.
The default conversation sorting in Thunderbird is by date, but as usual, that can get pretty overwhelming when you log in and see a crush of new messages on top of the older messages you never got to, stretching back into antiquity.
Fortunately, it’s actually pretty easy to sort your messages by sender and then group them up. That is, in fact, all you need to do.
First go to your inbox, or whatever other folder you want to sort, since this is a folder setting. At the top in the View menu, look for Sort By, and then choose the appropriate sort. You can choose things like date, received, star, order received, priority, and so on. The option you’d like to choose is From. This will sort the folder by the sender, with individual emails still listed. That’s the sort, but not the group.
In order to group your messages, you need to choose another setting. Once more go back into the View menu, and click the Sort By section again, and then look all the way at the bottom. You should see “grouped by sort” as an option. Click it to check it, and it will group your emails by your chosen sort option.
That’s it! There you have it; ways to group your email by sender in different major email clients.