
How to Move from Microsoft Outlook to Another Email Client
Outlook is a solid, good email client, but it isn’t always the email client in use wherever you happen to be. Some companies prefer to use Gmail, for example, and sometimes you just want a change. If you can’t use Outlook, don’t want to use Outlook, or are moving away from Outlook, you want to transfer and convert your emails.
Who wants to start fresh? Unless you’re inundated with spam and really long for Inbox Zero, it’s generally better to transfer over your old emails, contacts, and history. You lose a lot of saved and archived knowledge if you leave it all behind. However, the process of saving or importing this information may be different depending on your destination.
Converting from Outlook to Gmail
Gmail is one of the most popular email clients in the world, so it stands to reason that you might be transferring from Outlook to Gmail. Maybe it’s a personal choice, or maybe your company is using Gmail for Business, or maybe you just want a change in platform. Whatever the case, here’s the process you can use.
The first thing you should do is transfer your contacts list. To do this, you need to export it from Outlook and import it into Gmail. Here’s how.
First, open up Outlook. Choose File, then Open & Export, then Import and Export. This will open a wizard with a few options for you to choose. Choose Export to a File and click Next to proceed.
This will give you a choice of the type of file you want to export. The easiest file to work with is a CSV, or Comma Separated Values document. This is basically just a text file with your data separated by commas, which can be imported and read by just about anything. Chose Comma Separated Values and click Next.
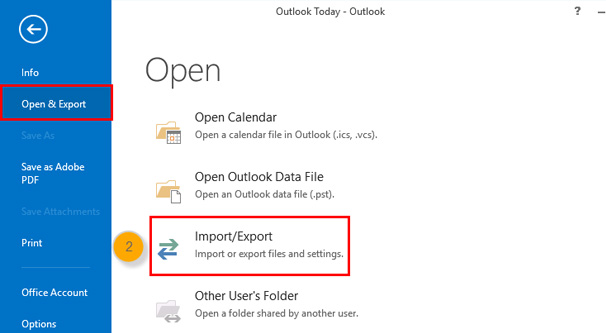
Here, you want to choose the right folder to export from. In this case, you want to choose the Contacts folder, to export your contacts. Click next and you will be asked to choose a file location. Browse to some location you’ll remember and save the file. Click Finish to finish the process.
Now, Google maintains one central kind of contacts hub for all of their services. It includes contacts for Android devices connected to your account, for Gmail, and for any other Google services you may use. Log into it at https://contacts.google.com/.
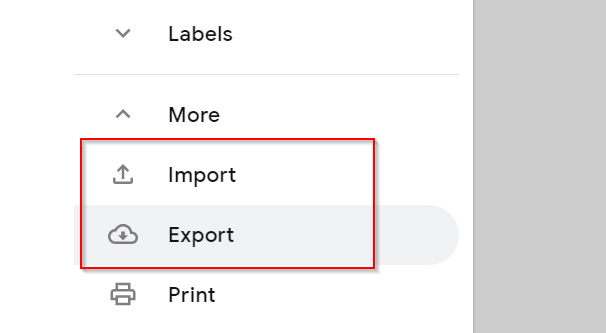
Once you’re logged in, make sure the left sidebar is open. If it’s not, click the three bars in the upper left corner. Find the More option and expand it, and find Import. Choose CSV as the kind of data you’re importing. Navigate to and select your contacts file and click to open it. Open the file and click Import, and Google will add those contacts to your list. You may end up with some duplicate contacts if you’ve used a Google service before; just merge or clean them up as need be.
Next, you want to transfer over your emails. This can be done from Gmail. Log into Gmail on the web and click the settings gear in the upper right corner. Click Settings to open the main settings menu. Look for the Accounts and Import header and click that.
One of the options in this menu is Import Mail and Contacts. Click it and a box will appear asking you what email address you want to import your information from. Follow the wizard as it asks you to sign into via their authentication system and imports your messages. Note: this will also allow you to import your contacts if the CSV method above doesn’t work.
Gmail will maintain this connection for 30 days. During that time, any messages sent to your old email address on Outlook will be forwarded to your Gmail address. After that time, you will need to set up forwarding in Outlook to send those messages to your Gmail account.
An alternative option is to add your Outlook mail account to Gmail. In the same accounts and import menu, look for the Check Mail from Other Accounts entry. Here you can add a mail account to Gmail for it to check. Gmail will “take over” the other account and allow you to check and use both from within Gmail. Simply click the Add A Mail Account option and follow the prompts to add your Outlook account to Gmail.
Converting from Outlook to Hotmail
Hotmail was one of the original online email clients, long before Gmail was even a twinkle in Google’s eye. The service was founded in 1996, making it one of the earliest webmail clients in the world. In 1997, Microsoft bought Hotmail to have their own webmail client, making it part of the MSN network of services. It was extremely popular for years.
Eventually, in 2004, Google announced their own competition in the webmail space, Gmail. Gmail grew viral very quickly between two primary factors: offering a huge amount of storage space compared to other webmail services, and its status as invite only. Users could invite their friends to gain even more free storage, and storage counted up slowly with a visible counter. This put extreme pressure on services like Hotmail to catch up or be left behind.
In 2005, Hotmail transitioned from a MSN service to a Windows Live service, as part of Microsoft’s consolidation and reorganization of their services. However, this was also the beginning of the end: with Outlook’s increasingly web-focused features, Hotmail was no longer necessary.
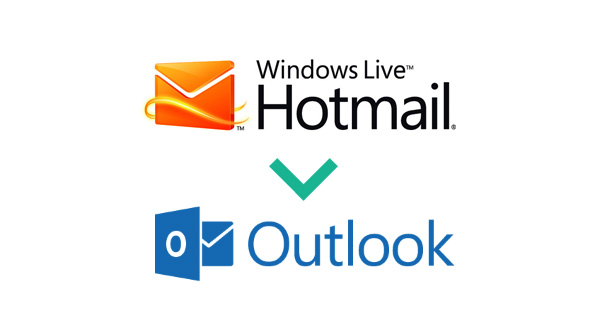
Hotmail lingered on as Windows Live Hotmail for several more years, but 2012 proved to be the end of the world for the service. This is when Microsoft opened up the beta version of Outlook.com – Outlook as a webmail platform – to the public. By 2013, Hotmail was essentially done for. Users could transition to Outlook.com, and Hotmail was essentially retired.
Thus today, even if you still have a hotmail.com email address, the service you’re actually using is Outlook.com.
As with the transition to Gmail, the first thing you want to do is transfer over your contacts. In Outlook, make sure you’re logged into the right account and then choose File, then Open and Export, then Import and Export. This opens the wizard for imports and exports. Locate the Export to a File option and click Next. Note: If you’re using a service other than Outlook to manage your Outlook account, follow the appropriate steps to export your file.
Now you need to choose the file you want to export. Outlook.com is going to prefer using a CSV file, so choose the Comma Separated Values option. This will give you what is basically just a text file with all of your contact information in a simple organizational structure. Click next.
In this window, you need to choose the contacts folder you want to export. Generally there is only one contacts folder, so choose it and choose to save it. Name it something you’ll remember and save it in a location you’ll remember. Click Finish to close the wizard.
Now you need to import the information. Log into your Outlook.com account and locate the People page. There should be an icon in the lower left corner that looks like two silhouettes.
Once on that page, click Manage, then Import Contacts. Browse to the location where you saved your CSV from the previous steps, choose it, and choose Open. Click the Import button and Outlook.com will import your contacts.
Now, unfortunately there’s not a good way to export a PST file from Outlook and import it into Outlook.com. Some older information I have indicates that you may be able to do it like this:
First, go to Outlook and click File, Account Settings, Account Settings, and check to see if it says Microsoft Exchange. If it does not, you will need to go to the auto account setup wizard and add your Outlook.com account to Outlook connected as a Microsoft Exchange account.
Next, make a backup of your PST file. To do this you will need to locate your existing PST file – the location varies – and save a copy of it in a safe place. Migrations often corrupt or destroy data, so having a backup on hand is important in case something goes wrong.
Now you will need to check the size of your PST file. Outlook.com has a nearly unlimited amount of storage space for accounts, but they don’t allow you to import too much data at once. These rate limits prevent email bombing that would make your inbox unusable. Ideally, your PST file will be under 4GB in size.
If your PST file is larger than 4GB – or, honestly, larger than 2GB – I personally recommend that you do some pruning, archiving, or deleting of old messages. Very few people actually work in a career where they need that much old data, and it can be very helpful to prune down the size of your active PST. There are different ways to go about doing this, and it can take some time, so it’s up to you. A smaller PST will make your data import go more smoothly, though, so it may be worthwhile.
Once you have your accounts linked up, you can simply drag and drop your messages from your Outlook account to your Outlook.com account through Outlook. You can move individual folders, or try to move the whole account at once, but the larger the account, the longer it will take and the more likely it will be to hit the rate limit for size increases.
Once you have transitioned all of your data over to Outlook.com and verified that it works, you should remove the sync between the two accounts. Go to File, Account Settings, Account Settings, and in the Email tab, remove the POP3 account. Click on the Data Files tab and set the OST file to the default instead of the PST file. Restart Outlook so it syncs with the new data, then remove your PST file.
You should now be able to manage your Outlook.com account from either Outlook or from the webmail app. You can read more about this whole process here.
Converting from Outlook to Thunderbird
Thunderbird is Mozilla’s open source answer to Outlook, and as such, it’s a good option for people who want to move away from the Microsoft ecosystem and into something more open and available. Since they focus on poaching users from other services, they have a tutorial for switching to Thunderbird from a variety of different services.
The general process here is going to be basically the same. You need to export your contacts and your emails from Outlook and import them into Thunderbird. Contacts are easy: simply follow the same process outlined twice above.
In Thunderbird it gets a bit tricky. You may need to install an expanded address book plugin to use import functions for files other than CSVs.
Rather than run through all of the various permutations of actions for different Outlook systems, I figure it’s best to let the experts speak for themselves. Thunderbird maintains a knowledge base – or rather, their community maintains a knowledge base, since community support is the core of open source development.
This page has some of the most up to date information about exporting and importing the relevant data from Outlook to your new Thunderbird account. However, it may also be worth looking to see if there are any new plugins that make migration easy. Sometimes new software is developed, but isn’t added to the knowledge base until it gains broader community acceptance.