
5 Ways to Forward Your Gmail Emails to Another Address
Everyone has their own workflow, their own situation. Some of you operate just fine with a single Gmail address, a single inbox, a couple of default labels and not much else. Others of you have half a dozen add-ons to expand functionality across six different email addresses, cross-forwarding and hyper-organizing to reach Inbox Zero by the end of every day. Both of you are correct; as long as it works for you, it’s fine by me.
Forwarding emails from one address to another can be very beneficial for a number of different reasons. It helps with organization. It allows you to delegate, manually or automatically. It can even be a good idea if you’re changing from one email address to another and don’t want to miss anything still hitting the old inbox. Rebranding a company will often change a company-branded email address, after all.
Here are five different ways you can set up mail forwarding with Gmail. Hopefully one of them will be useful for your situation.
Option 1: Gmail’s Automatic Forwarding Settings
Gmail has the ability to set up email forwarding automatically. It’s a setting that is available to all Gmail users, but is only accessible from the desktop client for Gmail. You cannot access it from the mobile app. Some third party email clients may allow it, but I don’t know offhand which ones do and don’t. If you know, feel free to leave a comment confirming.
To start with, make sure you’re on a computer and you have Gmail open. You know, the basic stuff. I can’t imagine you’d do well following the instructions if your computer is off or if you’re on, like, Yahoo Mail or something.
Make sure you’re logged into the account you want to forward messages from, not to. The source of the messages. Otherwise you’re going to be forwarding messages in the other direction, and that’s no good to anyone.
![]()
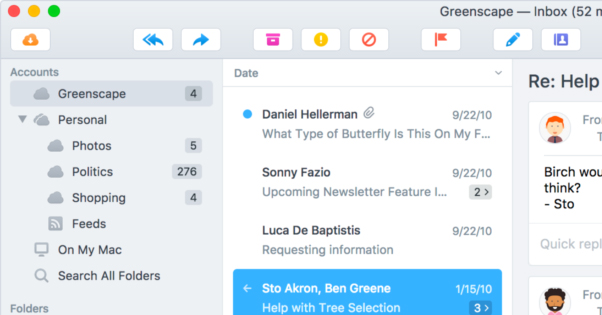
Look for the settings button in the top right. It’s the gear icon above your inbox but below the top bar that has your profile picture and the Google apps list. Click that gear icon, and then click the “settings” entry in the drop-down. This takes you to the settings menu.
There are a bunch of settings you can change here, of course, but you’re looking for the tabs across the top. They have labels like General, Labels, Inbox, and so on. The sixth one along (unless they have changed it since I wrote this) is “Forwarding and POP/IMAP”. Click on that tab.
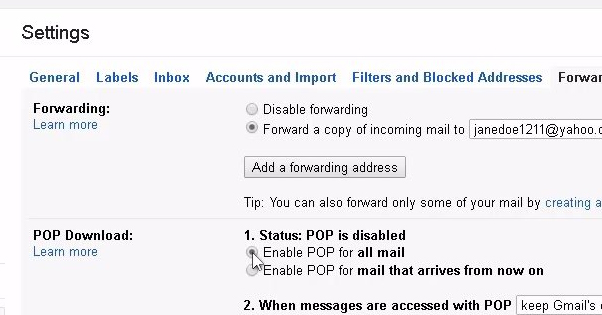
Up at the top, you will see a button that says “add a forwarding address.” When you click that button, a lightbox pops up that asks you to add a forwarding address. This is where you add the address you want to forward your messages TO. Add your address and save the dialogue box. This will take you back to your settings menu.
Now log into the other email address. Gmail sends a verification link, so that it can confirm you control both inboxes. This is a security feature and helps prevent identity theft; you don’t want to accidentally get your email hacked and have your password reset messages sent to the hacker, right? Well, I suppose this wouldn’t actually stop that. Still, it’s a verification that you typed the correct address in, which is just as important.
In your destination address, click on the verification link. That’s all you have to do here. Go ahead and log back out and go back to the original Gmail address. If you haven’t, you should refresh your browser to make sure the settings update properly.
Now go back to the settings menu and back to the Forwarding sub-section. There will be new options here, which allow you to decide what happens to the copies of emails you forward. You can have them automatically archive, delete, or just sit in the inbox. Gmail recommends that you keep a copy, in case the forwarding breaks or you delete messages and want to recover them.
If you want to disable forwarding later, just come back to this menu and click “disable forwarding”, and it will stop.
It’s worth noting here that this will forward all messages arriving at your inbox to the other account. If you want to be more selective about it, you should check out the second option below.
Option 2: Gmail’s Forwarding with Filters
The second option is useful for when you have two or more active inboxes that you want to separate messages between, but they keep getting mixed up. Alternatively, it can be useful if you have one central hub inbox that all mail is delivered to, which sorts and distributes it to other inboxes. In any case, you get to take advantage of another advanced Gmail feature, called Filters.
As with the first step, make sure you’re using a computer, though you may be able to do this from the app, I’m not sure. They don’t explicitly say you can’t, like they do with the normal forwarding option, so it’s possible. In any case, make sure you’re logged into the account that you want to forward messages from, just as in the first option.
Forget settings; this time you need to go to the search bar up at the top of Gmail. I know some of you probably never use this, and others use it every day. It’s a useful search of your entire Gmail account, including your spam folders and all archived mail.
Here you need to decide on how you want to sort your messages. What are the criteria by which you want to filter your messages? Are they all from the same sender? Do they have a specific format, like having a ticket number or a static subject line? Do they simply all have one keyword in them? Add these criteria to your search bar and run the search. If you’re curious about how you can use filters, here are some ideas.
You need to run the search for two reasons. The first is so you can proceed with the setup here, and the second is so you can verify that the search is showing you exactly the emails you want it to show, without being too broad or too narrow. Feel free to adjust your search criteria until you get the right level of search. Be aware that you don’t want to add a filter that relies on the emails being within a certain date range, because that date range will be static.
Click the drop-down arrow in the right-hand column of the search bar for advanced options. This is where you can layer on multiple search criteria without needing to know the Gmail search syntax. It’s also where you can see a “Create filter” button down at the bottom, next to the search button. Click that button and the window will change.
When a new message arrives that meets your search criteria, you can choose what to do with it. There are several options, but the one you’re looking for is “Forward it” with an “add forwarding address” option next to it. Click the forwarding address button, add the right address, and save the filter.
This method is pretty cool because you can set up multiple filters for multiple forwarding addresses, even if they have the same search criteria. You can thus forward the same message to multiple inboxes, or split apart the contents of one inbox between multiple other accounts.
Option 3: Chrome Extensions
This Github Entry is the open source documentation for this Chrome extension, called Multi Forward for Gmail. It does basically what you would expect it to do, similar to what setting up multiple filters does, except more conveniently.
In order to install the extension, you will need to be using Google Chrome as your browser. Install it via the web store in the link above. This adds a new option to the toolbar in Gmail. When you select more than one email in your inbox, the multi-forward button will appear.
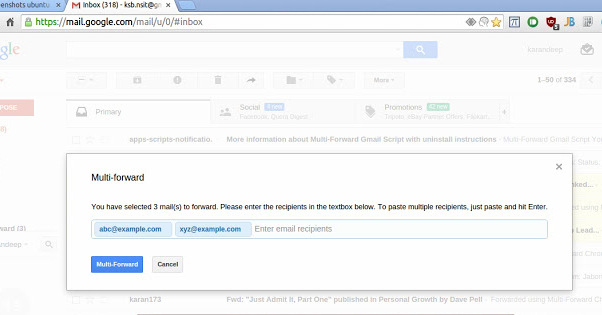
Click the multi-forward button and a box will appear with the label “enter email recipients.” This is where you can plug in as many email addresses as you want. You don’t need to send or verify confirmation emails with this method, it just works like forwarding a simple email.
The people who receive the emails can set up Gmail labels for “multi-forward” to see what messages they received from you when you use this service. It’s free to install and use.
There is, unfortunately, a hard limit to the number of emails you can forward using Multi-Forward each day. Since it’s a Google script, Google limits its utilization to about 100 emails per day. The exception is if you have a Work/Edu/Gov account with Google Apps; this will bump your limit up to around 1,500. This is not a limitation with the extensions; rather, it’s a limitation with Google Apps.
This is a good tool for cases where you need to forward a bunch of emails or documents to one user, or you want to back up a bunch of archived mail, without having to manually forward every individual message. Beyond that, it’s a bit too limited for most uses, I would think.
Option 4: Automatic Responses
It’s not quite forwarding, but with Gmail, you can set up an automatic reply message for messages you receive. It’s typically used for out-of-office responses, vacation notices, and other such responses. You can set this on the desktop Gmail or using the apps.
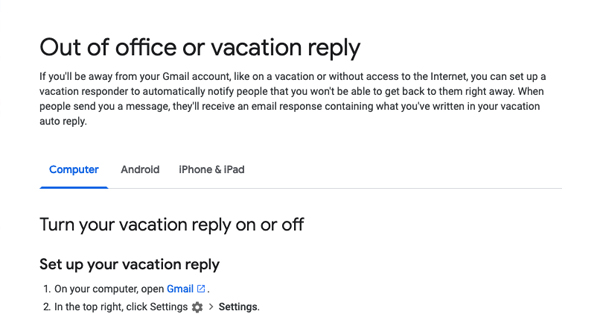
As usual, make sure you’re logged into the appropriate Gmail account. It doesn’t do you any good if you set up a vacation response on the wrong in box. This is particularly relevant if you have forwarding set up; you’ll be sending out of office responses to the inbox that is just automatically forwarding your messages, not to the people who sent them.
In Gmail, once again go to the Settings menu, under the gear icon. This time you will need to stick on the General tab, but scroll all the way to the bottom. The last entry is the Vacation Responder. This allows you to turn it on or off, and set a start and end date for the vacation.
Set up your email here. You can put in whatever subject line and email body you want, just like a normal email.
There’s one additional toggle I recommend using in most settings, which is “Only send a response to people in my contacts.” This prevents you from automatically sending responses to spammers, to newsletter mailservers, and to other people who just randomly send you messages. If you only want your coworkers and colleagues to know you’re out of the office, click it. If you want everyone to know, leave it unchecked. Save your changes regardless, and your vacation responder will be active.
So how is this forwarding? It’s not, really. You can use it to let people know you have a new email address and to direct new messages that way, though, which makes it useful in conjunction with other forwarding methods.
Option 5: Email Managers
This one isn’t specifically a forwarding option, but rather, a list of possible tools you could use to manage your email more effectively. Many of these support plugging in multiple emails so that you can merge them in a single app, which some prefer to having all of them jumbled up into one inbox. There are a ton of different platforms available out there. I’ve covered a lot of them in this post about SaneBox alternatives, as well as this list of email clients that meet certain criteria.
I haven’t had the chance to go through 30+ different email clients to check how their forwarding works with Gmail, though, so I’m going to leave that one to you folks. Let me know which of these tools you’ve used with Gmail, and which ones have the best forwarding options!